CUSTOM HEADWEAR / BUYER GUIDE
Custom Cap Pattern Placement: Check Seams and Brim
Use two real cap photos to mark pattern direction, crown seams and brim placement. Prepare artwork and physical-sample checks before approving a custom cap.
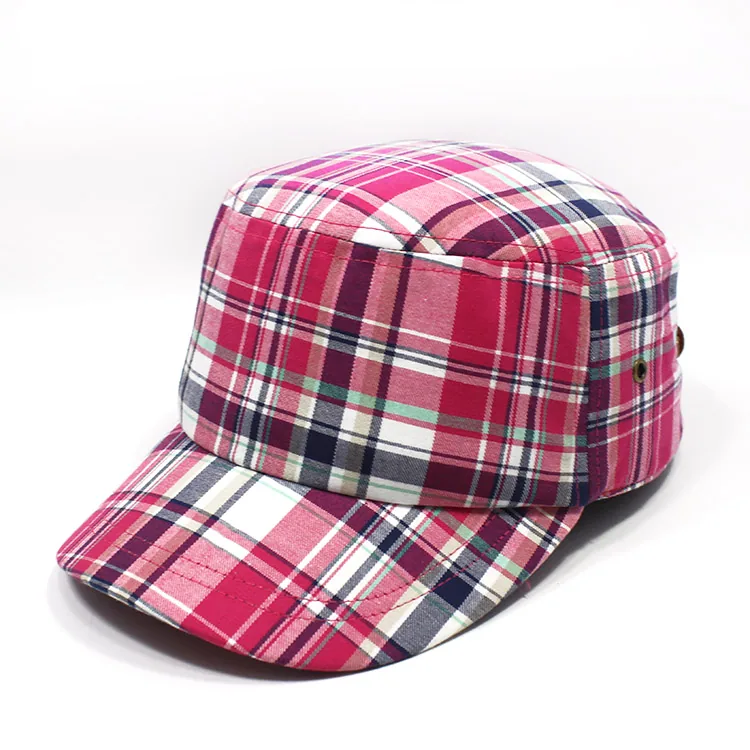
For custom cap pattern placement, a reference photo does not tell a supplier which line or motif must land at a particular seam. The plaid-like flat-top cap above makes crossings at the crown and brim easy to notice. A separate curved-brim cap with woodland-style motifs shows a different visual problem: a buyer may care where one recognizable shape sits even when there are no straight lines to align. These are two independent photo references, not samples made with the same material or method.
For a custom order, turn that visual preference into a pattern-placement brief before approving a physical sample. State which locations are intentional, which can vary, and which views are still missing from the reference photos.
Decide which boundaries matter to your design
Start with artwork you own or are licensed to use, or a supplier pattern whose availability and usage rights have been confirmed. A product photo is a visual reference, not production artwork or proof that its design can be copied. Mark the direction and intended scale of the proposed pattern on a drawing of your chosen cap shape. Then identify the places where a motif might cross from one cut area to another.
| Location to mark | Decision for the brief | Physical-sample check |
|---|---|---|
| Front center | Should a line or recognizable motif sit on the centerline, or can its position vary? | Check the front view against the approved drawing. |
| Visible crown seams | Is continuity across a particular seam essential, preferred, or unspecified? | Inspect both sides of each named seam on the same sample. |
| Crown-to-brim join | Should a stripe or motif appear to continue onto the brim? | Compare the join from the front and side. |
| Brim top and underside | Is the pattern required on one surface or both, and which way should it face? | Request an underside view; neither photo here shows it. |
| Rear of the cap | Is a particular motif position needed near a closure or label? | Request a rear view before approving that part. |
Do not write “match all seams” without showing which seams you mean. The panel-layout guide helps locate crown seams and logo space; this brief addresses how the pattern should meet the chosen boundaries.
Use straight lines and irregular motifs differently
On the plaid-like reference above, light and dark lines run across the top, front, side and brim. Their direction gives a buyer clear points to mark on the drawing. If a line should continue across a side seam, indicate the exact seam and the line to follow. If visual continuity is only a preference, say so and ask the supplier to show what is feasible on the proposed cap and material. The photo alone cannot tell you whether a visible offset was intentional, unavoidable or outside an agreed specification.
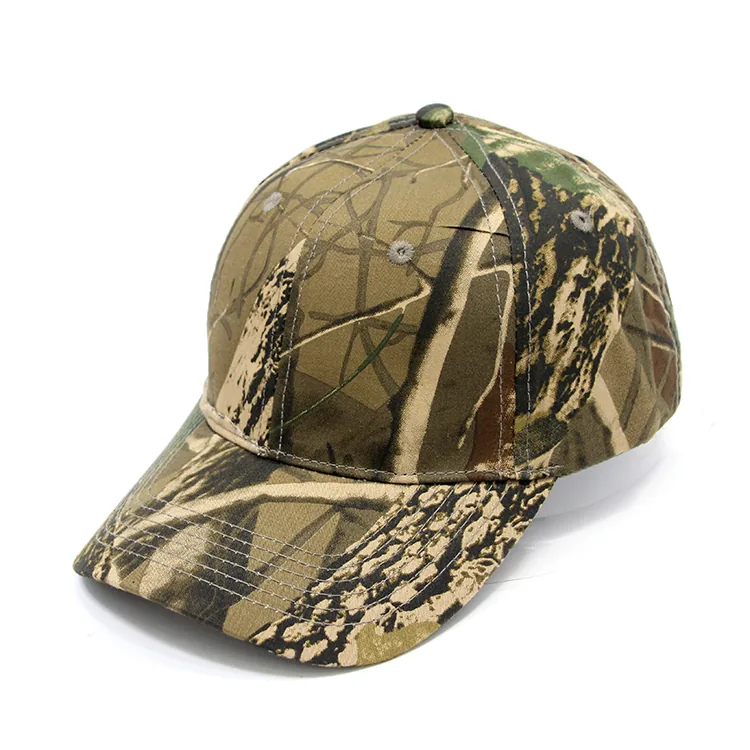
A separate cap with irregular motifs gives a different placement reference. Its front and side are visible; its underside and back are not.
For the irregular reference, a buyer may care more about the position and orientation of a distinctive shape than about an invisible repeat boundary. Circle any must-show motif and mark the area where it should appear on the proposed sample. If variation is acceptable, describe the acceptable visual outcome rather than inventing a production tolerance. Do not assume either photograph proves how its pattern was made, what fiber it uses, or that two pieces from a production run will match exactly.
Send artwork and a versioned placement sheet
For your own artwork, give the supplier the editable or approved repeat file and its version. If you are considering a supplier pattern, request its identifier, a physical reference and confirmation that it can be used for your project. In either case, attach a marked front, side, top and brim drawing. Indicate the intended orientation and scale with reference points on the finished hat. Ask the supplier to identify the actual material and pattern-making method proposed for your order; do not choose “printed,” “woven” or “yarn-dyed” from the appearance of these photographs alone.
Where exact continuation matters, request a feasibility answer before locking the artwork. Note which transitions are mandatory and which may move with cutting or assembly. When a sample arrives, photograph the same revision from all requested views, compare it with the placement sheet, and record each requested change by location. A change to the brim artwork should not silently approve the crown placement.
The 3D Studio can help communicate a hat-shape or logo concept. It cannot establish how a pattern will meet the crown seams or brim on a finished hat; use the marked placement sheet and physical sample for that decision.
The fabric and color customization overview is a starting point for discussing materials and appearance. If the issue is the shade rather than the motif position, use the separate physical color-approval guide and an agreed physical reference. A photo cannot settle either the finished shade or the method used to make a pattern.
Make approval a specific sample decision
For each revision, keep a short record that another buyer or supplier contact can follow:
Sample [ID and revision] — artwork or pattern source [file/version or supplier ID] — cap shape [approved reference] — front motif [target area] — named seam transitions [essential / preferred / open] — brim top and underside [required views] — rear [required view] — supplier feasibility [reply] — decision [approve / revise / unanswered].
Approve only the locations and views actually checked on that sample. Confirm any material, process and permitted variation in the project specification rather than inferring them from these two reference photos. Browse the headwear range or baseball and dad cap options to describe your starting shape, then send Alex your artwork or supplier-pattern reference and marked questions with your intended quantity and destination. Project terms can be confirmed from the actual brief.